
How to Maintain Automatic Tire Deflators (and Keep Them Accurate)
Last updated:
Automatic tire deflators need very little care. Most users never have to open them, and some go for years without any maintenance. This guide explains the signs that mean a deflator needs cleaning, why it happens, and how to do it at home in a few minutes.
Signs it is time for maintenance
If you have not changed your tires or your gauge, and you notice one of these:
- One or more deflators now leave the tire at a clearly lower (or higher) pressure than before, with the same setting. For example, a deflator that used to be accurate now deflates the tire to a much lower pressure than you set.
- A deflator does not start deflating on its own, even though the tire pressure is more than 10 PSI higher than the pressure you set.
Use the same gauge on all four tires. If only some of the deflators changed, the cause is most likely inside those deflators, not the gauge.
Why it happens
Dust, sand or other small debris can get inside the deflator and keep the center plunger from moving smoothly. The valve then closes slightly late, and the final pressure ends up lower than what you set. If it is ignored for a long time, the plunger may eventually stick. The deflator may then not start deflating at all, or may not shut off correctly.
The debris usually comes from inside the tire (for example, dust left after a tire repair, or what comes in with the air when inflating) or from the valve stem area.
What you need
A soft, clean, dry paper napkin or facial tissue. An air gun also works if you have one.
How to do it
Before you start: if you have calibrated your deflators, note the setting position of each deflator first (take a photo or make a mark). After maintenance, set each deflator back to its own position. You will not need to calibrate again.
- Screw off the locking cap.
- Take out the plunger and the spring.
- Clean the plunger and the hole in the main body with soft, dry paper (or blow it out with an air gun).
- Check that the plunger moves smoothly in the hole. Hold the deflator upright and lift the plunger part of the way up while turning it. You do not need to pull it all the way out of the main body. It should feel smooth, with no resistance. Then let go. It should slide all the way to the bottom under its own weight. If it sticks or moves slowly, clean it again.
- Reassemble carefully.
- Set the deflator back to the position you noted, and it is ready to use.
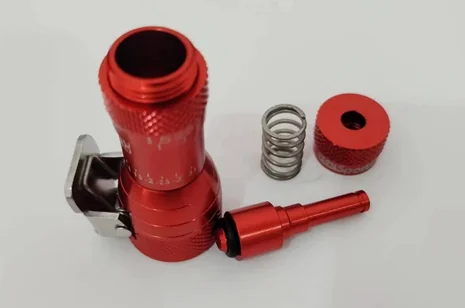
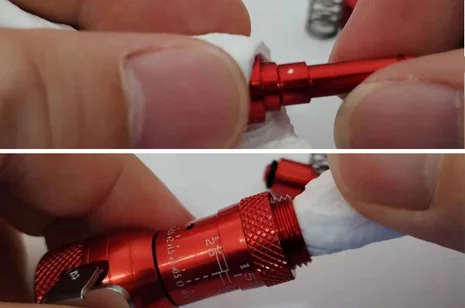
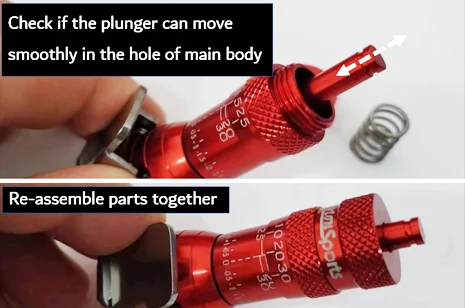
Service the deflators one at a time. Do not mix parts between units, such as the spring or the plunger, because each deflator is tested as a complete unit before it leaves our factory. Do not apply oil, grease or any other liquid to the deflator. It changes how freely the plunger slides in the main body, which can affect the final tire pressure.
If a deflator falls in dirt, sand or on the beach
A fall does not always mean the inside needs cleaning. If only the outside is dirty, wipe it clean with a soft, dry paper napkin. If you think the inside is also contaminated, including the hole that connects to the valve stem, take the deflator apart and wipe each part clean with a soft, dry paper napkin. Make sure every part is completely dry, and let the parts air dry before you put them back together. Do one deflator at a time and never mix parts between units.
How to make this happen less often
- Keep valve caps on your tires whenever you can. They keep dust out of the valve stem.
- If a cap is lost, clean the valve stem area before connecting the deflator. Press the valve core with a small stick or your finger to let a little air out, which blows the dust away. (Shown in the video.)
- Dust from inside the tire is hard to control, so do not worry about it. Only do maintenance when you notice the signs above. How often depends on how clean your tires and valves are.
If it still does not work
Contact us at vtonsports@gmail.com. Our deflators carry a 2-year warranty, and we will replace the set if cleaning does not solve the problem.
Frequently Asked Questions
How often should I clean my deflators?
Only when you notice the signs above. It is not a routine task, and some users never need to do it.
Do I need special tools?
No. You only need soft, clean, dry paper. An air gun is optional.
Can I swap parts between deflators?
No. Keep each deflator's parts together, because each deflator is tested as a complete unit before it ships.
Do I need to calibrate again after maintenance?
No, if you noted each deflator's setting position before you started (a photo or a mark) and set it back to the same position afterwards.
Is my gauge the problem?
If you use the same gauge on all four tires and only some of the deflators changed, the gauge is not the cause.
Can I use oil or lubricant on my deflators?
No. Oil, grease and water all change how freely the plunger slides in the main body and can affect the final tire pressure. Keep the parts clean and dry.
What should I do if a deflator falls in sand or dirt?
If only the outside is dirty, wipe it with a soft, dry paper napkin. If dirt got inside, including the hole that connects to the valve stem, take it apart and clean each part, then let everything dry completely before using it again. Do one deflator at a time.